
We Could All Use A Little Closure
A discussion of closed fingering in the service of phrasing and related topics.
An in depth analysis of The Humours of Ballyloughlin
An Analysis of Tim's playing on track 4 of Chulrua's first CD Barefoot on the Alter.
A clarification of my reed design in relation to FAQs.
Mark Stimson's description of working with Tim
Making Tim Britton’s “Wood/Cane Composite” Drone Reeds
A step-by-step article on this type of drone reed
A reflection by Tim Britton
Regarding Pakistani Made Uillean Pipes
Written by Kynch O'Kaine for The Pipers' Review Winter '02
In a recent conversation with Tim Britton, the topic of phrasing was getting a good workout. In my previous article with Tim, we came up with new nomenclature designating "closure." This "x" above the note directs one to close off before playing the next note. This technique has enabled me to grow technically and musically in ways that I previously didn't pay much mind to.
A piper for 29 years, Tim has a lot to share on how we can enrich our musical experience. After our conversation, I went back to practicing techniques he had told a class of beginners to start with years ago. I thought, "Hey why not share this with everyone?" So without further adieu...
K: When we last worked together on the transcription of "The Humours of Ballyloughlin" we came up with nomenclature for "closure" after a note. Would you elaborate on this technique and why it's important?
T: We're talking about closing all the fingers down, with the chanter on the knee, between chosen notes. Everyone knows about it but it's not talked about much. All the more evolved players make good use of it regardless of whether they might be characterized as "open" players. It's the most basic tool for playing with an eye to phrasing and sets the uillean pipes apart from it's predecessor the piob mor. I'm not talking about "staccato triplets". There are many pipers that use staccato triplets that avoid tending to the phrases or shapes in a tune. With the best players, in any music, there is a natural sense of balance and proportion, articulation and flow. Too much of anything "feels" excessive. Too much staccato can inhibit the flow although a well-placed closure can actually facilitate the flow. The phrasing of a tune is similar to phrasing in speech. If you intend to communicate as opposed to simply lining up words or notes or techniques, there must be an ebb and flow, a rising and falling. Each word is part of an idea, a shape, a phrase, a sentence. To play without any break is certainly possible but ends up sounding monotone, lacking in inflection and impact. Grace notes can break this up but can become monotonous as well. What I call "the judicious use of closure in the service of phrasing" is a simple, tasteful and gratifying way to bring out what the tune wants to say. We tend to think of this music as a technical challenge, but it's not only that. When all's said and done, it's a language for sharing things more profound than words can bear, a vehicle for the distillation of a people. We have the opportunity to develop a fluidity of expression that should be at least as shapely and articulate as speech.
K: In our last conversation, you mentioned that playing with an open technique "like a flute or whistle player," was in some ways "falling short." What did you mean by this?
T: It's not playing "like a flute or whistle player" that falls short. Flute and whistle players articulate plenty. It's only natural. The problem arises when a flute or whistle player takes up the Uillean pipes and it's no longer "natural" for them; or in the case of Highland pipers, they're accustomed to doing without it.
K: When I asked you how to develop this ability, you told me to practice a tune slowly, making every note staccato, not worrying about how it sounds musically. Would you expand on this?
T: We're using the tune as an exercise just to get over the hump. It will sound stupid and feel awkward. Go very slowly and make the notes big with clear closure between each note. One must get over the initial awkwardness of staccato so that it ceases to be a deterrent. If one applies oneself, it quickly becomes second nature. This leaves one in a position of choice rather than avoidance. It is virtually the rule among unguided beginners to avoid closed playing simply because it's easier, especially with gifted students who are all the more able to indulge their hurry. This habit can be a major limiting influence on a piper's style. I'd like to emphasize that I am not attempting to dictate aesthetic choice. It bears repeating that all accomplished pipers use staccato to some extent. I'm not even necessarily talking about using more staccato. It's all about how you use it. Subtle use of closure is easy to overlook. I've noticed that when I'm "doing my job" in this way, closure doesn't draw attention to itself. It "just feels right". I prefer technique that facilitates the music rather than music as a chance to display technique.
K: What do we do with the notes in the 2nd octave?
T: It should be easy to get all the lower hand notes (E, F#, G) staccato in the second octave. Unless you're coming from the first octave, the A, B and C will generally need to begin legato, but if you're going down from there, they may want to be closed after.
K: I've noticed that for the F#, G and B in the 1st octave, lifting one finger facilitates this practice. Any suggestions?
T: I always recommend learning a closed scale initially (i.e. lifting as few fingers as possible without compromising the note). This isn't to discourage would be pipers away from an open style. It is simply a practical consideration, which, after attending to, one should make whatever aesthetic choices desired. The closed scale is simply the only one that has a consistent reason for being. Any other way of playing a note is dependent on the situation, what effect you want, what note you're coming from and going to. For example, in the common reel Drowsy Maggie, playing EBEDEBE, one might leave the E fingers up when playing the Bs. No one would ever learn the scale like that but in this instance it would be fine to play the B that way.
Incidentally, I would close momentarily on the tail of the D, but I would leave the rest open. Just as evidence of my nonpartiality, that would be one of perhaps 3 places in the entire first part where I would close, and only very quickly.
Many chanters will give a flat pitch when playing a one finger G or B in the first octave. Some chanters won't render a note at all when playing a G this way. The F# shouldn't be a problem, nor should the second octave. It has been a guiding factor in my chanter design to allow for fingering and consequent tonal versatility. Larger holes help in this regard.
The bottom line is to use as few fingers as will work on your chanter and reed. Bear in mind that it's a common problem with neophytes to not lean into the bag pressure enough to get proper pitch and tone. It's also common for beginners to use overly weak reeds that have nothing to lean into. I'm not a proponent of hard or unresponsive reeds but one must have something to work with. It's also not necessary for a reed to be unresponsive for it to have some guts. Either extreme will affect the response to staccato. If the reed is too weak, it will be difficult to get first octave staccato in the lower hand without jumping the octave. If unresponsive, second octave staccato will be difficult and the articulation of each note will be indistinct, rendering a "foof" rather than a "pop".
K: Should this all be done with a metronome?
T: Metronomes are great for revealing flawed timing. My favorite use of them is not so much about that though. It's critical to play at a speed that minimizes technical challenge. There is a speed at which anyone can play anything, if they know what they're trying to do. Try half speed or slow enough to play perfectly and relaxed. The next step is to notch the metronome up one increment so the difference is virtually unnoticeable and consequently unintimidating. Stabilize that before moving to the next. If one continues this unhurriedly, one finds that one can play perfectly, much faster than ever imagined, without ever engaging the fear that is quickly followed by the mistake. Many players rarely, if ever, have the experience of playing flawlessly and confidently. However, it is possible to culture this, no matter how humble a player feels.
K: After practicing this way for a short time, I've noticed a great increase in control. My tight playing is more even and relaxed. I also have the space to make choices about timing. Are there any pitfalls to be careful of when practicing this way?
T: The tendency is to tighten the staccato out of existence, especially in triplets. It is important to practice lifting the fingers high enough to insure a clear, big, round note. This may seem counter to the goal of playing up to speed, but not really. Clear playing, whatever the technique, will always facilitate quality at higher speeds. It also allows for the articulation of the staccato without the "tight" feeling.
One alternative to the ubiquitous staccato triplet is to go into the triplet legato. A common example is a BCD triplet coming from an A. Normally the B, C, and D would all begin with closure. Try going into the B open and feel the sense of flow. This can also be useful in a second octave AGF# triplet where a staccato A may be difficult.
K Any final words Tim?
T: We still haven't talked much about where to apply this. Referring to recordings of the masters is always a good thing. Clancy, Ennis and Reck had beautiful phrasing. Almost any of the great pipers will evidence this under scrutiny. One thing to notice is that the phrase often doesn't start on the "down beat" but on the pick up note to that beat. One way to show this is to say "ta dum ta dum ta dum", the "dums" being the down beats and the "tas" being the pick up notes. Another is to add emphasis by nipping the end of a quarter note.
K: When do you expect the new Chulrua CD to be out?
T: Funny you should mention that. Playing with Paddy O'Brien has really made me look even more at phrasing. I highly recommend listening to him and other players who have nurtured this quality. The Paddy O'Brien Tune Collection, 500 tunes recorded in Paddy's inimitable style, available from him, is a wonderful source of interesting settings and phrasing ideas. The bowing of fiddlers like Paddy Fahey or Paddy Canny are great examples of this as well.
The next Chulrua release will hopefully be out in the Spring.
Written by Kynch OKaine for The Pipers' Review Spring 2000
Tim Britton is a piper who is as deeply rooted in tradition as he is in innovative interpretation. This is clearly evident in his version of the "Humours of Ballyloughlin," which appears on his trio Chulrua's CD.
I asked Tim where he first heard the "Humours of Ballyloughlin", and with a twinge of doubt, he recalled that it was most likely a Liam O'Flynn performance that initially inspired him to learn it. Tim informed me that he has been playing this tune for years, and the performance on the CD is the culmination of over two decades of refinement and tweaking.
There are those who may feel somewhat timid about learning an artist's performance note for note. Shedding this fear will not only lead the novice towards more musical freedom, it will give the experienced player fresh ideas.
It is important to remember that music is a language. I am not referring to the cliché "music is a universal language." The actual mechanics of how we learn music is identical to how we learn language. As babies we initially mimicked our parents to say "Mom" or "Dad." As our ability grew, we mimicked less and formed our own ideas. Even as adults we still listen to others, mimicking new words and concepts while growing from those imitations, forming our own ideas from the new material.
Learning transcriptions can be viewed in the same way. We are not trying to make a career out of others brilliance. We are immersing ourselves in the brilliance of others more experienced, thus nurturing our creative spirit while developing our musical vocabulary and intuition.
Tim encourages his students to study as specifically as possible everyone's playing that deeply touches them. One of the more unique stylists, he learned invaluable things from scrutinizing recordings of the masters.
Tim's wish to represent his performance accurately required decisions to be made regarding notation. Some of these decisions might appear to go against the grain of traditional notation for Irish music. At the same time, Tim felt that if this meant being more accurate, it was hardly a sacrifice. Therefore my approach was such.
Understanding the symbols: A Legend
A) The rehearsal numbers start at the beginning of each section excluding the first section. The form is AABBCCDD with each section yielding variations.
B) There are no triplets notated because, strictly speaking, there are no triplets in Irish music. This is contrary to popular nomenclature. The use of the triplet to notate two 16ths and an 8th, although common, is essentially inaccurate. For those who might be confused at the sight of two 16th's beamed to two 8ths, play the 1st three notes as an "old way" triplet with an 8th following that figure.
C) The entire piece is to be played with legato articulation except where noted. A dot over or under a note indicates closure with the end of the note heavily clipped. A small "x" over or under a note indicates a subtler closure, at times approaching inaudibility, at the end of the normal duration of the note.
D) Although this tune has been transcribed with the key signature of G, the tune is in D Mixolydian (i.e. D major with a flatted seventh being C natural). It should be noted that this tune, as many others, toggles and/or bends between the natural and flat 7th. This is the Irish equivalent to the American blue note.
E) Occasionally, there are "courtesy" natural signs for C after there has been one or more C#s in a row.
F) A line leading up to a given note head means bend up to; a line up from the note head means bend up from the note.
G) Arrows denote lifting the chanter.
H) The "squiggly" line = vibrato
I) An "x" connected to a note shows where the note "should have" sounded, but instead there was a fall from the octave.
Tim feels "the single most important musical element, aside from good rhythm, is the judicious and subtle use of closure in the service of phrasing. Attention to this and nothing else will render what the melody has to say far more beautifully than any other more obvious technique." Of course, there is more to this brilliant performance than a single element.
Although not noted, the tune begins with a back-D cut on G, then bending to A. Two bars later, the motive is repeated, this time with a bend to C natural. The figure occurring in beats 3 & 4 of bar 8 appears again in beats 1 & 2 of bar 13. Bar 14 gives the listener a rhythmic wake-up call with pronounced accents on G to a back-D cut C natural. Bar 17 contains a bend up to C natural while bar 19 bends up to C and beyond, slightly into the C# realm. The intriguing use of Eb (ghost D) adds momentary tension before revealing the F, sending the shape of the line back downwards (call and response and/or contrary linear motion).
Over-the-bar-line phrases in the context of the 6/8 meter in bars 3-4 and again in bars 19-20, give this performance complexity and a sense of rhythmic freedom rarely found in traditional music. The dotted 8th to 16th notes in 20-21 further break up the rhythm allowing it to "breath."
The C section (b. 33) gives us an effective and well-placed use of the two staccato 16th's tied to two 8ths. This cliché of piping, although a lovely figure, can be over-celebrated. Tim uses it prudently and with aplomb. It should be noted that these figures appear in the 3rd (b.36) and 7th bars (b.39) of the 1st C section and the 7th bar (b.47) of the repeat of this section. It is the placement of those repeated motives in odd-bar phrases that gives this performance such a high degree of rhythmic interest.
Bar 41 begins the last C section with 2 bent dotted quarter notes followed by 2 slurred 8th notes bringing the piece to a soaring climax before introducing the D sections. The overtly legato phrase in bars 41-43 punctuated by the "free" sound of the G roll, is in contrast to the tighter playing that occurs before and after this section. Although bars 41-43 allow the piece to breathe rhythmically, it contrasts to the above rhythmically subdivided examples. The motive is again repeated in bar 49, the beginning of the 1st D section. In addition, echoes of this motive resound in bar 60. This time the repeated motive was separated by an even number of bars. This kind of repetition gives the listener a sense of continuity and familiarity.
Bar 49 begins with a long note w/vibrato allowing the listener to "re-coup." The grace notes used in bar 46 & 54 are highly musical and beautiful, while effectively punctuating those phrases. The last time through the D section (b.57) starts with a staccato A/C#/A figure. This only occurs one other time, in bar 9, demonstrating once again, prudent use of an often over used cliché. Before the close of this chorus, we find E-flats and an F-natural. The use of chromatics in this modal key adds surprising and expressive shades of colour.
Tim's performance of the "Humours of Ballyloughlin" should be enjoyed apart from the above intellectual evaluation. An analysis of this type is an attempt to make us more intimate with its beauty. In the desire to grasp for the tangible, we may uncover many of the "hows" and "whys" of a performance. However, these discoveries are pure conjecture by the analyst; for the artist, in the rapture of the moment, is channeling something that transcends technique. Tim Britton (captured here on the last take of the recording session) exemplifies the kind of fire, passion, and pure spirit we all dream of hearing each time we reach for the on-switch...be it our CD player or our own creativity.
Written by Tim Britton, adapted from a response to a discussion on uillean pipe list serve in March '03.
I would like to take this opportunity to clarify a few points that come up with some frequency. Much of this commentary is included in my book for those willing to read carefully, thoroughly and with an open mind.
Firstly, there is no arguing that there are many ways to make a reed. The reason I named my book "My Method" was to point out that this is simply what works for me. It is the distillation of over 30 years of making reeds and continues to evolve. I will soon publish a new edition with a bit more clarification and information. [due out in April '04]
To a great extent, my methods are a result of an impatient attempt at cutting to the chase. This benefits me in that I'd rather be playing. It benefits my students to the extent that they'd rather be playing and to the extent that simple, logical, carefully controlled methods are easier to repeat. I have also favored, wherever possible, methods that require less skill. Having taught quite a bit, this point is invaluable. On the other hand, the more attention to detail, the more successful. Many of the details are in direct response to typical problems that have happened to me. I started out just as unsuccessful and frustrated as you might imagine, with a lot less access to knowledge than people have today. The result is a relative 100% success rate. I say this not to pat myself on the back but to encourage that it is possible if one perseveres. Evidence to the contrary is usually a symptom of not paying enough attention. Of course, experience doesn't hurt!
Having said all that, there is a wide variation in what pipers want/expect from their reeds, as well as, in the chanters they are reeding. I wouldn't feel my methods to be of much relevance if they didn't accommodate a range of necessity. Relatively speaking, most reeds can be adjusted or, failing that, can be altered slightly to fit any of the above. Mine are no exception and are, if anything, more versatile. The missing ingredient for most people is, of course, the knowledge. Although pursuit of subtly is infinite, the basics are not rocket science. Developing a hands on feel for it can take time, but there's no time like the present.
One common question is, "Are your chanters/drones/reeds loud or soft, bright or mellow?" The answer is "yes". With the minor adjustment of opening or closing the eye with the fingers, a reed/pipe can be loud or soft, bright or mellow. The tone issue gets more complex but starts there and continues with shaving/sanding.
Another question involves the fact that I make my reeds without collars. Many view this as radical and somehow central to the design. I assure you it is neither. Easy for me to say, perhaps. The point is I view collars as unnecessary and I make my reeds so they don't need them, either to play properly or to be adjusted. Although collars often affect a reed significantly, they can be easily avoided. Personally, I gravitate toward a minimalist elegant aesthetic. I'm attracted to a freely vibrating head, which can promote a richer more vibrant tone and response. A carefully implemented collar can, of course, work fine on any reed, including my own. My book has always included instructions to that effect. For some reeds, the collar is more integral to the design than for others, but even there, a reed can be adjusted to play fine without it. The goal remains to get the reed playing optimally regardless of the technique.
As far as compatibility of the reed design with different chanters is concerned, the most important variables are staple dimensions, head length and thickness of cane in relation to head dimensions. As long as the effects of these are understood and accommodated, success will follow. The section in my book on adjustment and the appendix on alternate reed styles address this.
One example of adjusting my usual design to accommodate a "typical" non-Britton chanter would be to leave the head a little longer and thicker. This would accommodate a smaller upper bore and back D that was sharp with one of my normal reeds. The normal process of making a reed a little long and thick and slowly pairing it down in length and thickness naturally accommodates this. If the second octave were sharp, the staple would have to be squashed down a little more, probably with a slower taper. One hopefully has an idea beforehand about the appropriate staple dimensions for a given chanter. Better yet, one can extrapolate appropriate dimensions from the response of a known reed in the chanter, adjusting accordingly.
I also typically add a tubing slide/extension of the next size up from the staple that can be inserted into the existing reed seat with a bit of thread and no other alterations. A Quinn chanter of circa 1999 vintage responded perfectly to one of my unaltered reeds with the simple addition of a slide extending 1/2" out of the chanter top. This makes sense considering that my chanters are essentially similar to Liam O Flionn's Rowsome chanter except for an additional 1/2" of length on the top incorporating the tubing slide. The reeds that Liam uses are very long in staple and head. The same effect is achieved by a shorter thinner head and shorter tubing staple with a tubing slide/extension. Aside from accomplishing the same result, it has the distinct advantage of the much more convenient and stable tuning slide. Being truly in tune requires frequent small but critical adjustments that are greatly facilitated by this slide.
My last concern is for those that question my willingness to make adjustments to others' reeds. One of the first things that I address in a lesson or workshop is to try out the students chanter/reed to see what they're working with/against. The comments and adjustments that follow are perhaps the single most important thing that I can do for them in the limited amount of time we have together. I am almost always able to make significant improvements very quickly and easily and in the process show them how to do it. Rarely is this not appreciated. Occasionally, my efforts are relatively for naught but almost never have they been detrimental. In any case, they are always a sincere and focused effort to help struggling and usually isolated aspirants who would otherwise be stuck not knowing whether it's them or their instrument, not to mention what to do about it. This almost always is a significant hurdle that many never effectively get through. I would rather take the chance on helping someone this way than defer to fear. I always recommend first and proceed carefully only with permission. I will admit that I will push my case at times. It is simply my overwhelming experience that improvement in response and tuning are often easily achieved and that it is the student who loses out by their understandable conservatism.
I tend to eschew arcane methods that are beyond my attention span but each to his own. I have discovered that not everyone is as interested in efficiency as I am or pursues it in the same way. No insult intended. It has more to do with my own impatience and concern for belaboring neophytes than anything else.
Focusing on the differences between my reed design and those perceived by some to be more normal is interesting and cuts to the crux of an important point that I tried to clarify above. Although my method is quite specific, it does leave room for different chanter requirements. In my early days in the early 70s the reeds I saw were more similar to mine than what I consider to be more modern trends. I feel it is more useful, both to myself and to my students, to point to the relationship of designs rather than getting hung up on differences or, worse yet, a sense of right and wrong. Many differences in reed design are simply another road that also leads to Rome. Some are potentially detrimental to some aspect of the reed. Some are overly complex to my mind. Some are simply irrelevant. All seem to "get there" for somebody.
I had known Tim Britton for twenty-some years as the resident piper extraordinaire at local contra dances, as a performer at Irish fests and charity fundraisers and, later, as his student on the tin whistle. About his pipemaking, I knew almost nothing. Tim knew me as, among other things, a handy guy with a strong back and a reliable pickup truck. So, on a winter's day four years ago, when he needed to relocate his shop from his house to an outbuilding on a friend's horse farm a few miles from town, he asked me to help with the move. His workbench--a massive slab of rock maple supported by an equally massive steel frame--was a beast to handle, and that’s about all I remember about his shop at that time.
Two years passed, and I didn't have time to think much about the Uillean pipes. My nose was to the grindstone of my door and window retailing business, one of a long string of wood-related jobs I had made for myself after training as a boat builder in my younger days on Cape Cod. Entrepreneurship had always been dicey, but I had made a living, raised a family, and (mostly) stayed out of trouble. I recall, sometime in the midst of it all, my wife asking me, "If you could do anything you wanted, without the consideration of earning money, what would you do?" I surprised myself by answering, without much hesitation, "Make bagpipes with Tim Britton." It was nothing more than a pipe dream (pardon the pun).
But then came September 11 and the aftershock to our country's financial core. Construction projects I was working on screeched to a halt and prospective orders vanished. In a few months I found myself without a business. So, what the hell…I might as well make bagpipes! I showed up at Tim's shop on a January afternoon and volunteered, in exchange for some piping lessons, to help him fill his longstanding orders. He started me out on bending small sections of brass flat stock into S curves, correcting my mistakes several times until I made them perfectly. What struck me first was his fierce attention to detail, to the precise curves he demanded of each piece and the careful method of polishing them on the buffing wheel. He would see things I could not, and would let nothing "slide." These S hooks, which with their matching D rings allow the piper to strap on without having to mess with awkward buckles, are probably the simplest piece in the whole pipemaking process, so I knew I had a lot to learn. Then, at the end of the day, I had my first piping lesson. It was, well... humbling. I barely could get a note out, and when I finally did, it sounded like a civil warning signal! And to my untrained eyes the Uillean pipes looked like a confusing mess of bent tubing, slides, keys, and thingamabobs. I could not make out what was what, nor what the purpose was of all those sticking-out do-dads.
Over the next year I would find out what drones and regulators were, along with stocks, blowpipes, resonators and the rest. We worked weekday afternoons, trying to start at one o’clock but more often two or three, sometimes working into the night. Tim had me boring and roughing out parts on the lathe: drone segments in batches of a dozen each, chanters, cherry-wood stocks, and so on. He would do the finish turning. Unlike my own shop and lots of other rattraps I'd worked in, Tim had "a place for everything and everything in its place." The idea was to never have to look for a tool; you put your hand down and it's there. He also insisted on having the blackwood dust swept from the floor at the end of each day. I found out this was not just an odd compulsion; it was normal in the course of the work to drop small parts and, with the floor swept clean, it was a lot easier to find them. Revelations!
Tim leads a busy life, with piping gigs from coast to coast, wheeling and dealing in high-end audio equipment, setting up sound systems for local productions, and answering lots of phone calls and e-mails about piping and pipemaking. Yet we had many orders to fill at the pipe shop, some of them going back almost a decade. I found myself alone in the shop for much of the time, and trying to do some of the work that was far beyond my abilities. Read: Mickey, the Sorcerer’s Apprentice. I began turning a chanter and thought I was doing pretty well on it until I started shaping the “doughnuts” for the key blocks. A moment’s inattention and the tool jumped sideways into the piece. There was a BANG! And all hell broke loose, the chanter broken and whipping around on the lathe. I almost got it in the face before I could shut the thing down. I felt terrible, since at that time we were quite low on wood and blackwood is expensive. Tim took it in stride and pulled me back to doing more manageable pieces, mostly rough-turning, corking, bellows-making, and of course buffing, putting the final polish on regulator and chanter keys, ferrules, etc. After a long buffing session I would look like a coal miner, my hands, face and arms black with brass and Tripoli residue (No, Master, not more buffing!).
An interesting dynamic was developing between us. I could only marvel at his skill on the lathe, and at the lightning speed at which he could turn out gorgeous pieces, especially his trademark drone resonators shaped like elegant tulip finials and fashioned as thin as seashells. Yet I could see that Tim had worked for a long time in isolation and had gotten into some ways of doing things that struck me as being, well… a bit freaky. So we hashed things out, trying to integrate into the shop some new techniques, such as milling key-slots on the drill press with a spiral cutter and X-Y milling table. We tossed out lots of my wackier ideas, which didn’t have a practical basis. It was not always easy, and egos sometimes got bruised. Often I would think, “I knew better” and would try a different way of doing a job. Time after time I would “discover” that the way he taught me was the quickest, most elegant and efficient way. He set and maintained an incredibly high standard for me to emulate, making reed slips to .0005” (a half of a thousandth of an inch!), turning on the lathe to within a thousandth or two and turning true enough so that the blackwood parts were so perfect in form that they would shine on the lathe with no finish applied, the first sanding being with 500 grit paper.
Sandpaper illustrates an interesting point about Tim’s way of thinking. Formerly, I had run a millwork shop in which we went through reams of sandpaper in short order. So at the pipe shop I started using sandpaper willy-nilly, tossing out pieces which were not half used up. With a straightedge, Tim tears sandpaper into 1/2” wide strips and uses them starting at one end, pulling off bits as they become too clogged. He says he gets to know a single sheet of sandpaper like a friend. This seemed a bit quirky to me, but now I see it as an indication of an intense focus on a minimalist conservationism, on perfection. So I have gotten into his mentality of applying immense care to every detail, even sandpaper.
My eyesight, which even with corrective lenses is not great, began to get in the way. Tim could see things I could not, however much I squinted. I took to wearing double glasses, a pair of 2X reading glasses over my regular lenses, and that has made a big difference. Call me six-eyes, but seeing is one thing and understanding, another! Tim would critique my work by drawing enlarged views of what I had done, with the errors exaggerated. What I could not see before was suddenly obvious. Focus. Learn to look. Turn the piece around; does it look the same?
Tim is tall; I am short. The lathe is set up for his stature. It took months of my feeling awkward, as if the turning tool was right under my chin, before we came up with the simple solution of making a 4” high moveable wooden platform for me to stand on.
Now, after two years, the backlog of old orders is nearly taken care of and we have a long rack of new chanters, drones and regs bored and roughed out, seasoning for new orders to come. We have ironed out ways of working together, better and faster, delegating according to skill. Our lead time on practice sets is about three months and not much longer on drones and regulators. We continue to refurbish and re-reed older pipes for pipers from around the world. A new edition of the reedmaking book is finished, with lots of refinements and a new troubleshooting section. Our web page, www.uilleanpipes.com (spelled with one “n”) has many additions, including a “Notes for Newbies” section. My piping, while still rudimentary, has at least progressed to the point where I am able to help Tim evaluate and fine-tune our finished sets. I have built my own half-set, with drones made of beautiful cocobolo wood, and have three regulators seasoning, almost ready to finish turn. I love the work and every day look forward to our afternoon at the shop. To the Iowa Arts Council, accolades and a hearty “thank you!” Their funding has been a big help in making this apprenticeship possible. And thanks to Tim for his patience and relentless pursuit of beauty and function, a lesson I am learning to apply to many other areas of my life.
As to the idea of the master/apprentice tradition, I would say there should be a lot more of it, especially for young people with an aptitude for manual work. My advice is to find someone in an arcane and highly skilled trade, someone like Tim who is recognized as one of the best in the field, and go into it with humility and a willingness to work hard. I see it as a fine alternative to attending college, which has become increasingly expensive and questionable in value. And it beats, by a long shot, flippin’ burgers! So it is a middle path in which one can learn a gentle trade, earn a modest living (without racking up tens of thousands in student loans), and give to the world something of lasting beauty. The main thing is to watch, listen, and practice with great care.Written by Mark Stimson for the Piper’s Review, Summer '05
The traditional “guill” drone reeds made from small diameter tubes of cane can be great. They are simple and cheap to make, have a warm tone and, with occasional tweaking, can be kept sweet and steady. These come standard with our drones, and there is plenty of information available on making them in the various reedmaking books and online. It’s worth noting that most pipers as well as some pipemakers do not fully understand the steadiness issue. Information on this can be found in Tim’s reedmaking book “My Method”, the new version of which is recently out.
In Tim’s shop we also make another type of drone reed: the “wooden dowel” or “wood/cane composite” type. Reminiscent of a clarinet or saxophone mouthpiece, the body is turned from the same blackwood we use for our pipes and a carved cane tongue is strapped to it. They have a clearer, richer tone, are more predictable, are easier to work with, and are less affected by climatic changes. They can also accommodate experimentation with various blade materials. They’re gorgeous, labor-intensive, and consequently expensive, but worth it. Here is how to make one:
First, cut a square, slightly oversized blank from cutoffs from your other work. (See table for lengths and diameters) Mount it in a four-jaw chuck on the lathe. If you don’t have a four-jaw chuck you can turn it round with a spur center and then use a three-jaw chuck. Drill a short “starter hole” of the appropriate size (see table) and follow with a gun drill, if you have one, or with a “D” bit, or lacking that, a twist drill. Put the bored piece between centers, true up the ends and rough-turn to about .025” oversize. Set it aside and let it season for a year if you can.

| Drone | Body Length | Diameter | Bore | Tongue Thickness |
| Tenor | 1 1/2” | 1/4” | 1/8” | .016” |
| A | 1 3/4 ” | 1/4” | 1/8” | .020 |
| Baritone | 2 1/2” | 9/32” | 9/64” | .028 |
| Bass | 4” | 5/16” | 5/32” | .044 |
When you and the piece have matured sufficiently, do the finish turning. Chuck between centers and “eyeball” the tool rest to make sure it is perfectly parallel to the lathe bed. Turn the piece to an even diameter, .010” oversize, measuring with a caliper. Mark for the depth of the reed seat and, with a square-ended parting tool, go in enough to define the tenon but leave it oversize for now to avoid splitting. We like to leave a small lip near the base to keep the cane-lashing thread from slipping off. Define this by turning the rest of the piece down to the final diameter. Work the tool slowly sideways, perfectly parallel to the tool rest, cutting with the edge of the tool rather than the face. This helps minimize deflection and vibration. Support the piece by holding it as it spins with your left thumb and forefinger, which may get quite hot! I also guide the tool with the edge of my thumb. Note: use a higher RPM than you would for larger diameter stock, so the surface speed is the same. The sides must be perfectly parallel, especially in the bridle zone, or the bridle will loosen or bind when you adjust it. More than .0005” (half a thousandth) variance is a problem. Measure carefully with the caliper and shoot for perfection.

We like to give the ends of our reeds a nice, decorative touch (see photo). The sides curve in parabolically towards the end and are topped with a cute tam o’ shanter-like finial and a pair of fine lines scribed at the point where the channel will end. Turn in these details, or invent your own. Finish the turning by taking the reed seat tenon down to size, cutting in the thread groove, and scoring, lightly, for the cane lashing. Try to turn so that the piece needs almost no sanding. If your turning skills are a little lacking, focus on sharp tools, proper tool angle and support. This is particularly important with a tube this slender turned between centers as it can easily crack with either too much pressure from the tail stock or too much pressure from the tool. With a well sharpened tool and proper technique it should be relatively frictionless if not effortless. Sand the piece with #500, #600, and #1200 grit, reversing the piece on the lathe in the final sanding. Burnish it with a pinch of clean, fine blackwood shavings, again reversing the piece on the lathe.
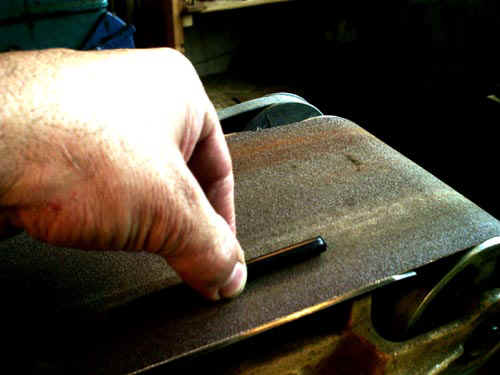
Now, we need to make a flat spot on the dowel for the cane to lie against. We use a horizontal belt sander with medium/fine grit cloth. Pinch the middle of the dowel with thumb and forefinger and push the piece decisively against the belt. Try not to sand your fingertips. Pull the piece off and check for results: if it’s sanding more toward one end, slide your fingers a short distance toward the other end and go again, making sure you set it onto the belt exactly evenly. This takes some practice. Stop when the flat spot is even from end to end and in far enough to just be “kissing” the reed seat.

Next, we mill a slot. Use a milling machine or a drill press with an X-Y vise, and a spiral cutter. Center it on the flat and mill through to the bore, starting about 1/8” from the outside end and going about 3/4 of the way down the length of the flat. If you go very slowly the channel edges will not need cleaning up. If it is rough, clean up the inside edges with a small hook knife and the outside edges with 400 grit sandpaper. Finish-sand the flat with 400-600 grit sandpaper on a perfectly flat surface such as a piece of glass or the drill press table. Plug the outside end with glue and a leather “punching” or a small bit of dowel. Oil the reed bore and body. We use Watco® Danish Oil Finish.
To make the tongue, cut an appropriate sized slip of cane from leftovers from making chanter reeds (not drone reed cane). Start with a piece slightly wider and longer than the width and length of the flat on the wood “body”. Shave it down from the pith side with a flat chisel on the under side of your shooting board. Stop when it’s even from side-to-side and end-to-end, and about .005 thicker than the finish measurement. On your flat surface, sand it to final thickness using increasingly fine grits ending with 600 or 1200. Be sure to keep the thickness exactly even through the length and breadth correcting with finger placement. One thousandth off will make a difference! Sand the edges even and parallel, making sure they end up symmetrical in section view. Spring the tongue and “eyeball” the arch, checking for anomalies. Cut the slip to final length with a reed knife on an end-grain wood block and round off the corners of the tip.
Tightly lash the tongue to the reed body with waxed nylon thread, with close, even turns and no messy overlaps. Firmly wind the bridle; about five turns is good, and tie off with a surgeon’s knot and a touch of super glue to secure it. Hold your thumb against the bridle and, with your fingernail, spring the tongue. Unlike guill type reeds, you can do this quite far without breaking the tongue. Significant arching in this way is always necessary to keep the tongue from clapping shut. Test the reed for “crow” by sucking on the open end. It should emit an even buzz and not clap shut with increased suction. Wrap thread on the groove in the reed seat tenon. Now you’re ready to try it in your drone. See Tim’s book for info on bridle adjustment issues such as double toning, tuning, and steadiness.
As you can see, a lot of work goes into making dowel reeds. But, with a bit of practice and by doing them in batches to save set-up time, they can be turned out without too much trouble. The result is worth the effort: dowel reeds are pretty to look at, easy to maintain, and oh-so-rich-sounding. Happy turning!

Written by Tim Britton for Iowa Source, July-August '99
For the last 25 years, every July, thousands of Irish music afficianados make the pilgrimage to Miltown Malbay, Co. Clare, on the west coast of Ireland, the home of the late great piper Willie Clancy. Although "Willie Week", as it is known, includes a dizzying array of formal classes, the "good shtoof" happens in the 14 pubs that line the half mile of the main (almost the only) street. Many of the best fiddlers, pipers, flute players, accordion players, etc. in the world, legends to those in the know, can be found sharing a few tunes and creamy headed pints of Guinness, insulated from the cool Irish air by the human packing material of eager listeners. In 1976, a fifteen year old version of myself was among them.
One of the many memories burned into my formative brain was of a concert of probably the most influential Irish band to date, the Bothy Band. A collection of some of the most brilliant fingers and minds in the tradition, they cut new ground from tunes in the kitchen to the concert stage; traditional Irish music's answer to The Beatles. Six hundred people packed into a crossroads church a few miles out of town to witness the premier of their latest material to be found on their second album, Oh Hag You've Killed Me, yet to be released a month later. Tune after tune broke over us like the waves on the beach not far away. The album still stands as a landmark in folk rock fusion. As I write, this 23 years later, a friend of mine, Steve Jacomini, is there for the first time, creating his own memories. Steve is the owner of Cafe Paradiso, a fiddler and close friend.
Written by Tim Britton
Some of you may be aware that I have made a habit of refurbishing Pakistani made UPs for many years and have worked with one of the two companies who make them, to improve their product for the sake of the unsuspecting customer. I have sold numerous sets like this after altering them to my specs, as well as altering existing sets for customers who bought them elsewhere only to find them unplayable until “fixed” by me. My many customers for these instruments have thanked me profusely for my willingness to offer workable pipes at a price that allowed them to get them at all, or for helping the hapless victims of unscrupulous businessmen.
After much effort I have concluded that the Pakistani craftsmen are not willing and/or able to pay enough attention to detail to make it a satisfying venture on my part. This has as much to do with my own feeling of not liking to invest my energy on such compromised results as it has to do with any objective assessment of them.
Having said that, I feel I have turned many of both models into good sounding instruments. My complaint (after I get done with them) is more with the logistics than acoustics. The key work remains sloppy as well as a plethora of logistical design issues all of which come to bear on the piping experience.
I do not agree with the author of the recent Pipers' Review article about retrofitting Pakistani made Uillean pipes on most counts. It is clear that he is not knowledgeable or capable as a pipemaker, although as such, he is similar to the bulk of the readership. I would not recommend anyone in his position blindly playing pipemaker. His position is, of course, understandable and I respect the intent of his valiant efforts. I simply don't recommend it. His conclusion, stated so unequivocally, that the pipes were a product of confusing plans for flat sets is, IMO, a product of his own lack of understanding. As I have stated in my reedmaking book, most pipers and even pipemakers don't understand that drones can be made to play absolutely steady. The techniques that make a drone reed play steadily mostly make it play sharper as well. Many drones are made such that it is difficult or impossible to make them play in pitch and unwaveringly throughout normal pressure dynamics. Unless there are more than the two companies making UPs in Pakistan that I'm aware of, I think it likely that he and the pipemaker he consulted don't fully understand this point.
His conclusion that the chanter throat length was 3/16” too long, again is, misguided. I purposely make my chanters a little longer on the top to accommodate what I feel is a better logistical relationship with my reeds which tend to fit other chanters perfectly with the addition of a small telescopic tubing extension, conveniently acting as a tuning slide as well as maintaining acoustical integrity throughout varying tuning positions. There is so much variability in pipe and reed design that a discrepancy of this magnitude is par for the course.
It is quite possible that the holes were not place accurately, but if the pipes he altered were ones from Mid-East Manufacturing, the company I worked with, the horizontal hole offset may have been intentional as per my instructions which place the holes more ergonomically than simply straight down the front and back of the chanter, which, in my experience, is not quite how the hands naturally want to sit on the chanter.
Hole placement and size is best done from well-evolved plans rather than trial and error. Lastly, although 400 grit is fairly fine, I don't recommend sanding bores. Chanter boring can only accurately be done with an appropriate reamer.
For my own part, although I will continue supporting owners of my work wherever it is applied, I am no longer selling refurbished Paki UPs nor will I refurbish existing instruments. My own value judgment is that the companies that have them made and those that sell them, although possibly well intentioned, are not in a position to be responsible to their customers in a way that this instrument demands.