Last updated November 23, 1999
I have several 3D cameras in different formats but Holmes stereocards are my format of choice. I like them because when one person is hogging the stereoscope, others can still look at the photographic image without a viewer. I pick up inexpensive stereoscopes whenever I can so I have a bunch of viewers around at any one time.
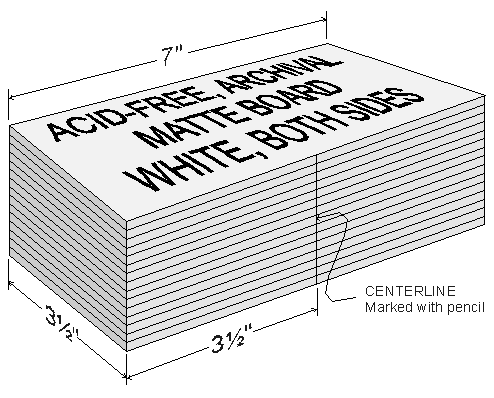
I go to my local picture framing store and buy a sheet of archival matte board (non-acid). At my store, if you buy the material they will cut it for free. I have them trim out cards of 3 1/2 x 7 inches. They grumble a little when they realize how many cuts they have to make but they still do it for free. When I get home I stack them into a pile, jog them on the desk to even up the edges and measure to the center of one of the 7 inch edges. Then I draw a line along the bottom edge of the stack to give me a centerline reference.
Most of the time I shoot with a Nimslo. I use it because it is so much easier than my two Realists or any of the other 3D cameras I have. The differences in the quality of the optics are of little concern because the prints I have made are only 4 1/3 diameters enlargement and even with the small enlargement from the Holmes stereoscope, views are still within acceptable limits of sharpness. The camera is effortless to use.
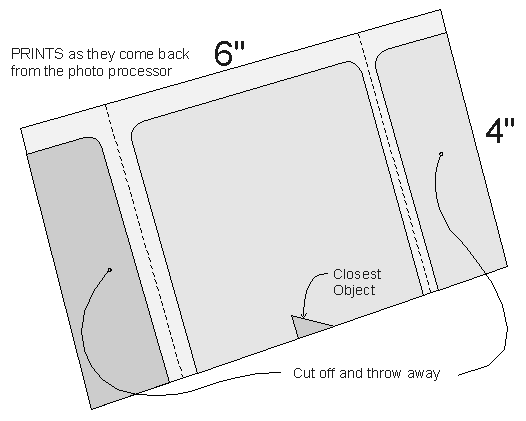
If your photo processor has a half-frame mask, ask them to use it (for the Nimslo, Nashika, Rittai, or Image Tech). My local camera store used to have one and it worked perfectly but they got new equipment and now the processing is a bit trickier. If they use the regular 35mm full frame mask, the exposure and color balance can get thrown off a little because each print has a little of the frame before and the frame after printed on the ends. But it usually isn't much of a problem and if one is bad they rerun it to match the other. I get 4x6 glossy prints which work out perfectly for getting a good cropable image. Obviously only half the print is good. I have to throw away the bits from the frame before and after. The parallax resulting from the lens separation on the camera is only about 3/16" on the final print usually, except if I am shooting close up, then it can get up to 1/2". I only have the photo processor print the first and fourth frame from the Nimslo set of four. The middle two are never printed. It really helps if you can get access to the technician who does the actual printing. Tell them what you are doing and show them some of the mounted prints when you are done. This goes a long way in encouraging their enthusiasm and cooperation. Ask for the same person to do your printing every time so you don't have to explain it again and again and again.
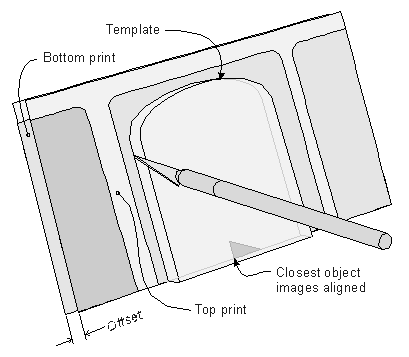
For a template I got a piece of scrap plexiglass. Any thickness is ok as long as it's stiff enough. Mine is 1/4 inch thick. I cut it to the size of one of the final frames, 2 5/8 x 3 3/8 inches is my preference, but you can make one any size you want within the limits of your viewing ability and camera’s format. Just make sure that the width of the template is about 1/4” to 3/8” less than maximum width of the print as you get it back from the processor. You will need the extra space for cropping. I traced half an elipse on the top to give it an old-time feel. I cut the template out on my band saw and smoothed all the edges on my belt sander. I have practically no expense in this at all.
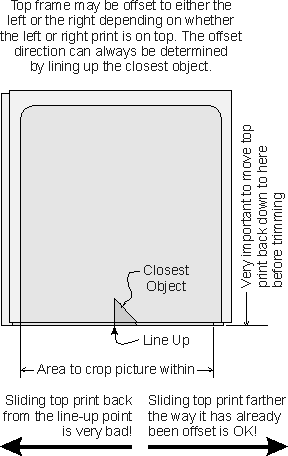
Over time, I learned a little trick for trimming the prints. It took me several years to work this out but it's a good place to start. If you have skewed or mismatched prints, go to the Aligning Skewed Prints page before proceeding. Lay the two prints, one on top of the other. Slide the top print up a little so about 1/16" of the bottom edge of the bottom print shows. In each print, line up the object that was the closest to you front-to-back when you took the picture. This is usually on the bottom edge. It can be higher up, maybe it extends off the right or left hand side. With experience you will realize when this is the case but for now just use the bottom edge. With the closest object on each print lined up, take note of where the edges of the frames are and slide the top print back down till the bottoms of the prints are flush. The left and right edges of the prints won't line up but the closest object will. I put the prints on a cutting pad. Position the plexiglas template over the prints so it's bottom is flush with the bottom edge of the prints. You can crop up and down a little, but then you will also have to trim the bottom edge. Slide the template left and right within the croppable area till you have the picture framed the way you want it. Be careful because the parallax of the left and right images makes the edges of the prints offset a little. You have to make sure you trim off the edge of the frame in both the top and bottom print otherwise you will have a white vertical stripe in the final product. When everything is lined up just perfectly, press down hard on the template and draw an exacto knife all the way around it. I usually have to make 2 or 3 passes because I don't always cut all the way through the first time. You now have a trimmed stereo pair, each frame of which is exactly the same size as the other.
This method yields an image with the apparent window at the same point, front-to-back, as the closest object. You can experiment with shifting the prints farther in the direction that they are already offset. That will make the closest object even farther back behind the window which will look just fine. Sometimes this adds a greater 3D feel. If you move the frames back so the original edges of the photos more closely align (past the point where the closest objects line up), you will not be able to reconcile the window and you will experience visual confusion. This is the problem with mounting prints just the way you get them. This is only a rule of thumb. Like all rules, there are times when breaking the rule gives you something better. Just keep it in mind.
Because of the peculiarities of the Nimslo, I get prints that have a black band across the top and they bleed off the bottom edge of the print. One of the frames has a red dot on it. This indicates the left frame. Subtracting the quarter inch black stripe, I still have another 1/4” to 3/8” for vertical cropping. Usually something in the foreground is at the bottom of the print and the sky is at the top so I crop out the sky. Your own picture composition will dictate which portion of the picture you will crop out.
I spray the backs of the prints with "spray mount" glue. There are many good products to do this, pick your favorite. After spraying, I line up the prints face up in my hand and cross view them. If they look right, I reverse them and stick them to the card. If I see reverse stereo I look at them again with regular, parallel, free-viewing to confirm they are oriented properly. A lorgnette viewer works pretty well for this too. The point is to keep you from mounting your prints backwards. When I press the pictures down I shift the left one about 1/16" to the left of the centerline reference I made on the cards when I got them back from the framing store. The right frame goes 1/16" to the right. This gives a 1/8" septum which is enough to keep the two frames from bleeding together and presents a distinct apparent window. Yet it's not so far apart as to make free viewing more uncomfortable. This is a distance I arrived at myself over the years.
Some people prefer to mount their prints with the "proper" infinity separation. When freeviewing, the infinity separation is the same distance apart as your eyes or about 2 1/2 inches. Most stereoscopes, however, use a little trick to allow prints that are wider than normal eye spacing to be used. This results in infinity spacing of about 3 1/2 inches. You can determing the exact distance by putting a blank card in your viewer and stepping outside into the sunlite. Turn the viewer lenses towards the sun until the sun's image is shining onto the viewcard. Move the card back and forth till the sun is focused as a pinpoint of light. The distance between the left and right image is the infinity separation and, for your informaiton, the distance from the card to the center of the lens is the focal length of the lens. Now, when you mount your prints, find the object in the print that is the farthest away, usually it is on the horizon. Then, when you glue your pictures down, make sure that the farthest object in the two prints is the infinity spacing apart. Take care to make the space between the two prints equally divided on either side of the centerline. There are a couple of small problems with this approach. Every stereo viewer has a slightly different infinity spacing, especially between brands. If you mount for one brand, it will be the incorrect distance for another brand. If you have only one viewer this isn't much of a problem. Also, the farther apart you move the prints, the harder they are to freeview. When you look at objects that are closer to you, your eyes converge or point inward. You do this all the time and it is not uncomfortable at all. It is not comfortable for you to look at prints with your eyes diverged or wall-eyed. This means that if you mount your prints closer together than infinity spacing, you will still be able to see them just fine, with no discomfort. Personally, I have not noticed that mounting prints to the infinity spacing gains me anything but you will have to decide for yourself. For those who use Q-Vu mounts, I recommend that you mount for the window and not for infinity spacing.

You should take a lot of care when you glue the frames down. If you match up the bottom edge of the frames with the bottom edge of the card you won't get any up/down shift. Make sure the frames aren't rotated either. My archival cards are white on both sides so I glue a view on each side, cutting my storage in half.
I finish off the process by storing the card in an archival sleeve that I get from Light Impressions. I also have several of their stereocard storage boxes. They sell these as a set. Stereocard storage kit; 200 sleeves, 1 box, 20 dividers; item 5048, $11.80
Light Impressions - 1-800-828-6216
One time I couldn't get my normal white archival matte board and had to settle for a buff color instead. Even though I didn’t really want it then, this looked more like old natural paper or psuedo-aged stock.

For just a few dollars you can get a rubber stamp manufactured. You probably know someone (if not yourself) that can run out something from their desktop publishing software. Take that to the rubber stamp guy and have him make the stamp from your art. Make it look like an antique photo studio logo but have it personalized to your own name.
If you shoot black and white negs and you have a cooperative photo processor you can have the prints made on color print paper. Nowadays, color prints are cheaper than b&w anyway. Have them adjust the color balance so you get a slight sepia tone.